ZZtheHANDYMAN

How To Clean Gutters

How To Clean Gutters: 7 Simple Steps

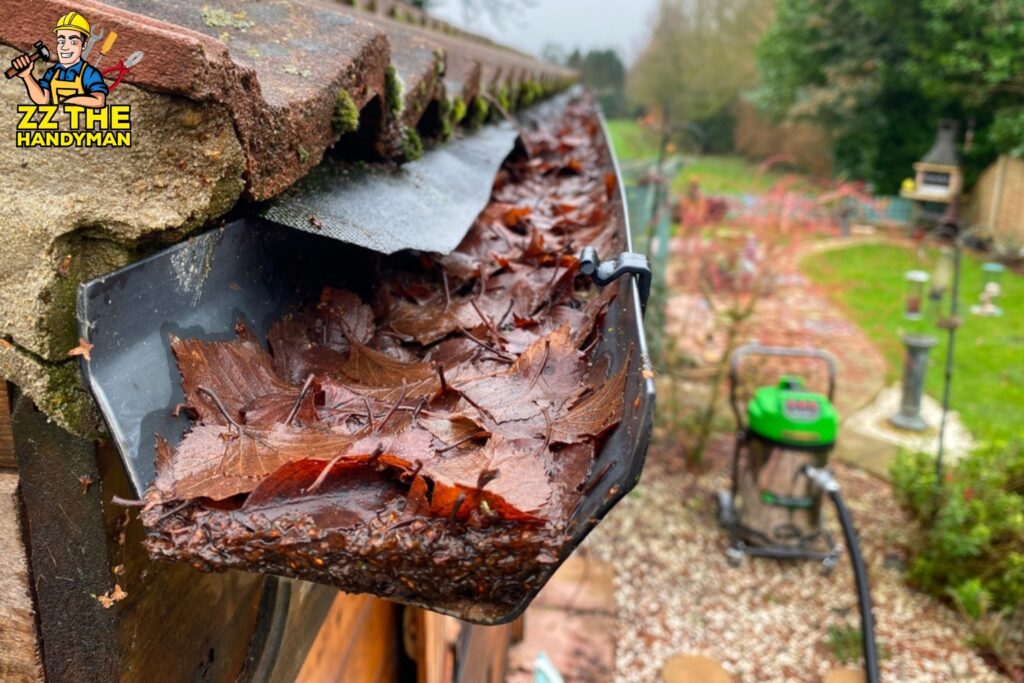
Gutters are one of the most important yet overlooked parts of your home. They protect your property by channeling rainwater away from your foundation, siding, and landscaping. However, when gutters become clogged with leaves, dirt, and debris, they can no longer do their job effectively. The result? Water damage, pest infestations, and costly repairs. The good news is, cleaning your gutters isn’t complicated—you just need the right approach, tools, and safety measures. In this guide, ZZ the HANDYMAN walks you through 7 simple steps to clean your gutters like a pro. Whether you’re a seasoned DIYer or a first-timer, this guide will help you protect your home and keep those gutters flowing smoothly all year round. Why Cleaning Gutters Matters Before we get into the steps, let’s take a moment to understand why gutter cleaning is so important: If you’d rather leave this job to a professional, ZZ the HANDYMAN offers expert gutter cleaning services nationwide. But if you want to take a DIY approach, let’s dive into the simple steps. Step 1: Gather the Right Tools and Safety Gear Before climbing a ladder, make sure you’re well-prepared. Here’s what you’ll need: Optional but helpful: a gutter cleaning attachment for your hose or pressure washer if you’d prefer to clean from the ground. Pro Tip: Have a friend hold the ladder for added stability. Safety should always come first when working at heights. Step 2: Position Your Ladder Safely Ladder safety is key. Place your ladder on a flat, stable surface and follow the 4-to-1 rule: for every 4 feet of height, position the ladder base 1 foot away from the house. Avoid leaning your ladder against the gutters themselves, as they can bend or break. Instead, lean it against the wall or fascia board. If your gutters are two stories high or your roof is steep, consider hiring a pro like ZZ the HANDYMAN. Professionals use stabilizers and harnesses to ensure complete safety. Step 3: Remove Large Debris by Hand Once your ladder is secure, start removing large debris like leaves, twigs, and dirt by hand or with a scoop. Place the debris in a bucket or bag attached to your ladder to save time and avoid a big mess on the ground. If your gutters are particularly full, work in small sections—about 2-3 feet at a time. Clearing debris systematically ensures nothing gets left behind. Handy Tip: Wet leaves and dirt are heavier and harder to remove. If possible, wait for a dry day to make the job easier. Step 4: Flush the Gutters With a Hose After removing the bulk of the debris, use a garden hose with a spray nozzle to flush out the remaining dirt and small particles. Start at the end opposite the downspout and work your way toward it. This step will help you: If the water doesn’t flow freely down your spout, there’s likely a clog (we’ll cover that in the next step). Step 5: Clear the Downspouts Downspouts are crucial for directing water away from your home’s foundation, so keeping them clear is a must. If water isn’t draining properly: For underground downspouts, consider adding extensions to direct water further away from your home. Step 6: Check for Damage While you’re up there, inspect your gutters for signs of wear and tear. Look for: Make small repairs right away to prevent bigger problems later. Seal cracks with gutter sealant, tighten screws, or replace damaged brackets. If your gutters are beyond repair, ZZ the HANDYMAN can replace them with a durable, low-maintenance system. Step 7: Install Gutter Guards (Optional) Want to cut down on future cleaning time? Install gutter guards. These mesh or screen covers keep large debris out while letting water flow through. They don’t eliminate the need for cleaning entirely, but they make the job much easier and less frequent. How Often Should You Clean Your Gutters? A good rule of thumb is to clean your gutters at least twice a year—once in the spring and again in the fall. However, if you live in a heavily wooded area or experience frequent storms, you may need to clean them every 3-4 months. You should also check your gutters: Safety Tips for Gutter Cleaning Cleaning gutters isn’t overly complicated, but safety should be your top priority: When to Call the Pros While many homeowners can handle gutter cleaning themselves, there are times when calling a professional makes sense: ZZ the HANDYMAN offers reliable gutter cleaning and maintenance services nationwide. With our trained technicians, top-notch safety gear, and commitment to quality, we ensure your gutters are clean, damage-free, and ready to handle any storm. Benefits of Professional Gutter Cleaning by ZZ the HANDYMAN Here’s why many homeowners choose to outsource gutter maintenance: DIY vs. Professional Cleaning: Which Is Right for You? Feature DIY Gutter Cleaning Professional Gutter Cleaning Cost Low upfront cost Higher upfront, saves repair costs later Time 2–4 hours for a single-story home 1 hour or less Safety Risk of falls and injury Professional-grade safety gear Thoroughness May miss hidden clogs or leaks Full inspection and cleaning Convenience Requires time and effort Hassle-free If you’re comfortable with heights and have the right tools, DIY can work. But if you value your safety, time, and peace of mind, call ZZ the HANDYMAN to get the job done right. Final Thoughts Gutters may not be the most glamorous part of your home, but they’re essential to protecting it from costly water damage. With these 7 simple steps, you can keep your gutters clean, extend their lifespan, and maintain your home’s curb appeal. For many homeowners, though, gutter cleaning is a time-consuming and risky chore. That’s where ZZ the HANDYMAN comes in. Our professional team provides gutter cleaning, inspection, and maintenance services to keep your home safe year-round. Don’t wait until you see water pooling around your home or notice damage to your siding. Schedule a gutter cleaning today with ZZ the HANDYMAN and rest easy knowing your home is in expert

How To Clean Gutters: 7 Simple Steps Read More »

Leaking Window

Your Guide to Fast, Reliable Repairs with ZZ the Handyman

If you’ve recently discovered a leaking window, you’re not alone. It’s one of the most common — and frustrating — issues homeowners face. Whether it’s a slow drip, foggy panes, or water pooling on your windowsill, leaks can lead to serious damage over time, including mold growth, rot, and structural compromise. So, who should you call for a leaking window? This guide walks you through the signs, causes, and solutions of window leaks — and explains why ZZ the Handyman might just be your best call. Understanding the Problem: What Causes a Leaking Window? Before you pick up the phone, it’s important to understand why your window is leaking. There are multiple potential culprits, and pinpointing the cause is the first step toward a proper fix. 1. Poor Installation If your window wasn’t installed correctly, gaps and misalignments can allow water to seep through during heavy rain. 2. Worn-Out Seals and Caulking Over time, the sealant around your window frame can deteriorate, crack, or separate from the wall, leaving room for moisture to sneak in. 3. Clogged or Faulty Window Drainage Windows, especially modern ones, come with built-in drainage systems. When these get blocked with dirt, leaves, or debris, water has nowhere to go — and may come inside instead. 4. Flashing Problems Window flashing is a thin material that directs water away from the window structure. Improper or damaged flashing is a common cause of leaks. 5. Cracks in the Frame or Glass Sometimes the window itself is damaged. A cracked frame or pane can allow water infiltration, especially during storms. Signs You Need to Call a Professional Window leaks can be sneaky. Here are some warning signs you shouldn’t ignore: If any of these sound familiar, it’s time to act. Who to Call for a Leaking Window? Here’s where things get real: not every contractor is right for the job. You might be tempted to call a roofer or general contractor, but the most effective — and affordable — option is often a skilled handyman with experience in window repairs. And that’s where ZZ the Handyman comes in. Why ZZ the Handyman Is the Right Choice Affordable, Honest, and Fast Unlike large window replacement companies, ZZ the Handyman offers affordable, honest service tailored to your needs, not upselling you on a full window replacement when a repair will do.   Local Expertise ZZ serves homeowners across the United States, bringing years of hands-on experience fixing everything from minor leaks to major window damage. He knows how regional weather patterns affect windows and can recommend the best materials and sealants for long-lasting repairs. All-in-One Solutions Whether it’s sealing, caulking, flashing, frame repair, or complete window removal and reset, ZZ the Handyman does it all. That means you don’t need to call multiple contractors — one call gets the job done right. Emergency Response Dealing with a sudden storm leak or flooded window sill? ZZ offers emergency handyman services in many areas. He’ll stop the leak fast and assess the damage so you can prevent further problems. What to Expect When You Call ZZ the Handyman When you contact ZZ for a leaking window, you’re getting more than just a repair — you’re getting peace of mind. Step 1: Thorough Inspection ZZ starts with a comprehensive window inspection, checking the seals, sills, flashing, frame condition, and nearby walls for water damage. Step 2: Diagnosis and Repair Plan Once the issue is diagnosed, ZZ explains the problem in simple, no-nonsense language, and outlines your repair options. Whether it’s a quick sealant job or full-frame replacement, you’ll know exactly what to expect. Step 3: Precision Repairs ZZ uses high-quality tools and materials to ensure a long-lasting solution. From resealing and weatherproofing to re-flashing or window frame fixes, he’s meticulous about getting it right the first time. Step 4: Cleanup and Follow-Up Once the job’s done, ZZ cleans the work area thoroughly and may schedule a follow-up (depending on the severity) to ensure everything’s holding up after the next rain. How to Prevent Window Leaks in the Future While ZZ the Handyman is always ready to help, he also believes in helping homeowners prevent problems before they start. Here are a few of his top tips: 1. Inspect Windows Every Season Look for cracked caulking, foggy panes, or signs of wear every few months. 2. Keep Weep Holes Clear Use a thin wire or toothpick to keep the drainage holes at the base of your windows clean and open. 3. Reseal When Needed Exterior caulk doesn’t last forever. Check it yearly and reapply if it’s cracked, brittle, or peeling. 4. Install Window Awnings In areas with frequent rain, small awnings or overhangs can protect your windows from direct exposure to water. When Is It Time to Replace the Window? ZZ the Handyman is all about repair over replacement — but sometimes, a window is just too far gone. Consider replacing your window if: If that’s the case, ZZ can still help you select and install energy-efficient replacement windows that suit your style and budget. Frequently Asked Questions Can I fix a leaking window myself? If it’s a small issue like a hairline crack in the caulk, DIY repair may work temporarily. However, improper sealing can make things worse. For most leaks, it’s better to call an expert like ZZ the Handyman to avoid long-term damage. How much does a leaking window repair cost? Costs vary based on the severity and location of the leak. A simple resealing job might be under $150, while major repairs can run higher. ZZ the Handyman offers free estimates and transparent pricing, so you’re never in the dark. Will insurance cover a leaking window? Sometimes. If the leak was caused by storm damage or other covered events, your homeowner’s insurance may help with repair costs. ZZ can provide a detailed invoice and damage report to assist with claims. Final Thoughts: Don’t Wait — Fix It Now A leaking window may seem like a small problem, but left

Your Guide to Fast, Reliable Repairs with ZZ the Handyman Read More »